Grass Fed Beef Bone Marrow: Use it for a Luxurious Steak Dinner in Twenty Minutes

Marrow bones in pan, ready to be roasted.

Marrow bones in pan, ready to be roasted.

This is a recipe for the French dish Entrecote à la Bordelaise, a classic ribeye steak served with shallots and bone marrow.

A bite of this can be best described as "meat heaven". It feels luxurious, is incredibly nourishing, and takes only 20 minutes to prepare. Enjoy!

If you’re active on Instagram, please tag us at @stjohnsorganicfarm when you post a photo of the final result! We’d love to see how it went in your kitchen!

Entrecote à la Bordelaise

INGREDIENTS

  • 2 St. John’s organic, grass-fed ribeye steaks

  • 3-5 St. John’s organic, grass-fed marrow bones

  • 1 shallot, finely diced

  • salt

  • pepper

METHOD

  1. Preheat oven to 400 degrees. Place bones in baking dish and bake 15 minutes or until marrow is easily removed from bones.

  2. Using a butter knife or small spoon, remove marrow from bones.

  3. Pat steaks dry with paper towel and season well with salt and pepper. Grill steaks until medium-rare, about 3-4 minutes per side.

  4. While steaks are warm, spread bone marrow on steaks and garnish with shallots. Serve immediately.

I hope you enjoy this simple and delightful French dish. Tag us on Instagram to let us know what you think!

Updates from the farm. Dec 2020

The weather is clear and chilly, the days are gorgeous and sunny, and a bit brisk if the breeze picks up.

Saint John’s Organic Farm

Saint John’s Organic Farm

We started feeding hay last week; Aaron and Claire load up 5 of our 750lb bales on the trailer and take it out to the field where they spread it out down the paddock. Right now we have two groups of cows who are each eating about 1000 lbs of hay per day. So Aaron and Claire take out about 4 loads in a morning and then there is enough hay out for the next week. Aaron will set up a movable electric fence to give the cows an appropriate section each day, along the same theory we use when grazing the paddocks in the summer. We have found that it is really good to keep cows in the field all year long, they do just fine in the cold. We adjust their feed rations so they get more if the temperatures plummet, and try to feed a little extra so there are leftovers for them to sleep on, but they seem to adapt quiet well to the low temps. It’s great to have them out on the grass turf even though the grass is pretty well grazed down, they stay healthy in the fresh air and sunshine, and the manure is distributed straight back to the field; it’s a lot less work than cleaning corrals, managing compost windrows, and hauling compost out to spread in the fields.

Aaron Dill - with Ragnar, hauling hay out to the field

Aaron Dill - with Ragnar, hauling hay out to the field

The steers are still grazing, and doing well on the stockpiled grass. At this rate we’ll graze them all winter long on grass that grew this fall. We’ve managed to do this every year for the last 10 years, except for the snowpocalyse in 2016. Then we had to feed hay to the steers too, though the grass was still viable to graze after the snow melted down.

Our frost-free waterlines are working well to all groups of cows. What a gorgeous system! Aaron turns them on when he goes out on his daily rounds to move fences to feed cows, and then several of us split up in the evenings to go drain the short supply hoses for the night. So much better than the years when we had to haul all their water out in a 500 gallon tank! Especially with 125 head, many of which are eating hay, we were hauling water almost every day.

Beef harvest is all wrapped up for the year, but we have about 7 pallets full of beef in Boise Cold Storage, so we’re well supplied to meet anyone’s beef needs throughout the winter and spring!

We are already looking at which rib roast we want for Christmas dinner.

Cold plunge! November 2020. Click on the picture to see a video of the whole experience!

Cold plunge! November 2020. Click on the picture to see a video of the whole experience!

Aaron recently began a new practice of ice water plunges, exploring the Wim Hof practice for health. He set up an old water tub in his backyard, and goes out every couple days to immerse in the ice water. There is some interesting research on the effect of cold exposure, to strengthen your circulation and thermo-regulation, and how it causes a reaction in your core to superheat your blood, like a microfever which cooks out impurities and kills viruses. This takes training however, so it’s best to start with cold showers. Aaron is putting together a progression of cold exposure training ideas that he’ll post on his Share the Gift instagram and facebook pages in the near future. Enjoy! 

May your holidays be bright in the midst of a crazy year, may you enjoy the warmth of your family, and may God grant us all peace.

An Amazing Beef Liver Recipe (That Doesn’t Taste Like Beef Liver)

Beef liver fries

Beef liver fries

Beef liver is known for two things: its all-star nutrient profile and its pungent, unmistakable taste.

My family has tried 4 beef liver recipes in the last year, and this one is excellent because...well, it doesn’t taste like liver! 

The key is to slice and soak the liver; the soaking removes the pungent taste. 

After soaking, the liver is battered, fried, and dipped in garlic aioli --  it’s a crowd-pleasing, crunchy preparation. Enjoy!

Beef liver fry dipped in garlic aioli.

Beef liver fry dipped in garlic aioli.

If you’re an instagramming kind of person, please tag us at @stjohnsorganicfarm when you post a photo of the final result! We would love to see how it went in your kitchen!


Beef Liver “Fries”


INGREDIENTS

  • 1 lb St. John’s organic, grass-fed beef liver

  • 2 - 2 1/2 c flour

  • 1 teaspoon paprika

  • 1/4 tsp salt

  • 1/4 tsp black pepper

  • roughly 2  c buttermilk, milk, or whey

  • roughly 1 c beef tallow, enough to be at least 1/2 inch deep in frying dish

EQUIPMENT

  • cutting board

  • knife

  • food storage container with lid

  • heavy-bottomed dutch oven or deep skillet

  • prep bowls

  • tongs

  • cooling rack (optional)

  • baking sheet (optional)

  • splatter guard (optional)

METHOD

1. Slice liver into 1/4 - 1/2 inch wide strips. Place into food storage container and cover with buttermilk, milk, or whey. I used about 1 cup. Place in refrigerator and allow to soak for at least 2 hours. I left it soak overnight and continued the preparation the following day.

Beef liver sliced into ½-inch wide strips.

Beef liver sliced into ½-inch wide strips.

2. Drain liver and pat dry.

3. Mix together flour, paprika, salt, and black pepper in a shallow bowl. Pour remaining 1 cup buttermilk, milk, or whey into another small bowl.

4. To batter the liver, roll one slice in seasoned flour, dip in milk, and roll in flour again. Place slice on cooling rack. Repeat until all liver slices are battered.

Battered liver slices placed on cooling rack, ready for frying.

Battered liver slices placed on cooling rack, ready for frying.

5. In a heavy-bottomed Dutch oven (I used cast iron), melt tallow on medium heat. When tallow is about 350 degrees, it’s ready to use. If you don’t have a thermometer, sprinkle a pinch of flour on the tallow. If it sizzles and swirls, it’s ready.

Tallow melting in Dutch oven.

Tallow melting in Dutch oven.

6. Place 2-3 paper towels on baking sheet with  unused cooling rack on top. This will be where the fried liver will rest after cooking. The paper towels will help absorb any extra fat.

7. Using tongs, slowly add 3-5 battered liver slices to the hot tallow. The tallow should sizzle and bubble around the liver. Be careful not to crowd the pan, as that will cause the tallow to cool and prevent it from cooking properly. 3-5 slices worked well for my pan.

Liver slices frying in tallow. The bubbling means the tallow is hot enough!

Liver slices frying in tallow. The bubbling means the tallow is hot enough!

8. The liver will cook quickly. Using tongs, slowly flip each liver slice after 1.5 - 2 minutes. Cook another 1-2 minutes and transfer to cooling rack. Repeat until all liver is fried.

NOTES

1. Kid-friendly modification: To make this recipe more kid-friendly, substitute ketchup, mustard, or sour cream for garlic aioli and omit or use less paprika and black pepper in the seasoned flour.

2. Easily reheat by baking at 200 degrees for 10 minutes.

Garlic Aioli

INGREDIENTS

  • 1 large egg

  • 1 - 1.5 c avocado oil, olive oil, or melted duck fat

  • 1 - 2 cloves garlic, minced

  • 1 tsp mustard

  • 1 Tbsp apple cider vinegar or distilled white vinegar

  • 1/4 tsp salt

EQUIPMENT

  • blender or immersion blender

  • rubber or silicone spatula

  • spoon

METHOD

1. Crack egg into blender.

2. Turn blender on medium speed and blend egg.

3. While blender is mixing, very slowly pour oil or fat into blender. Start with one cup and add more at the end to reach your desired consistency. 1 1/3 cup was ideal for me. The stream of oil should be thin. It’s essential to pour slowly for a proper emulsion to form. It should take 4-5 minutes to pour the oil. After 1 cup of oil has been blended in, turn off blender and gently shake and scoop aioli with spoon to determine if desired consistency has been reached. If you prefer your aioli to be thinner, add 1/4 cup of oil at a time in the same slow manner.

4. Turn off mixer. Add garlic, mustard, vinegar, salt. Blend. Taste for salt and desired tanginess. You may desire more mustard or vinegar.

5. Serve at room temperature or chilled. Store in an airtight container in the refrigerator.

I hope you enjoy this unique and crunchy preparation of beef liver. Tag us on Instagram to let us know what you think!

How to Render Beef Tallow

Tallow, golden in color and solid at room temperature.

Tallow, golden in color and solid at room temperature.

Tallow is rendered beef fat. Rendering means the fat has been melted on low heat for several hours and strained of impurities, leaving us a result that is mild in flavor and smell, chock full of fat-soluble vitamins A, D, E, and K and minerals, and long-lasting if well kept.

Equipment

  • St. John’s organic beef fat, chilled

  • Knife

  • Cutting board

  • Food processor or meat grinder (optional but very helpful)

  • stock pot

  • cheese cloth or flour sack towels

  • colander

  • storage vessel (mason jar, baking dish, food storage container, etc.)

Process

1. Trim off bits of muscle and tendon left on the fat. As you cut, you will notice a cellophane-like membrane all over the fat. Pull off what you can, but it’s impossible to get all of it off.

Fat after being trimmed of muscle bits.

Fat after being trimmed of muscle bits.

2. Cut the fat into 1 inch or smaller chunks. Cutting it into chunks will make grinding it in the food processor or meat grinder much easier.

Trimmed fat cut into chunks.

Trimmed fat cut into chunks.

3. Process the fat chunks in the food processor or meat grinder until it looks like ground meat. If you don’t have a meat grinder or food processor, mince the fat as small as you can with a sharp knife. By breaking the meat into small chunks, we create a lot of surface area for each piece of fat. The increased surface area allows for more opportunities for the impurities to render out of the fat. This will result in a tallow that is very mild in smell and taste.

Beef fat processed into small granules.

Beef fat processed into small granules.

4. Place ground fat into a large stock pot or crock pot and turn heat to the lowest setting possible. Stir every hour or so and check that the fat is not burning or smoking. The fat will melt and impurities (small solid bits) will come out of the fat and rise to the top. You will know the fat is done rendering when the impurities rise to the top and look crunchy. The total time will vary based on how much fat you use. Expect it to take 5-10 hours. When I rendered 7 lbs of fat, it finished in 8 hours.

Ground fat beginning to melt in stock pot.

Ground fat beginning to melt in stock pot.

Impurities are rendering out of the melted fat, about 2 hours in.

Impurities are rendering out of the melted fat, about 2 hours in.

5. Line a colander with two layers or cheese cloth or flour sack towels and drain over a large bowl. Gently squeeze the towel to get all of the liquid fat out. Careful, it may be hot!

6. Once it’s finished draining, pour fat into storage vessel of choice. I poured mine into a parchment paper-lined glass baking dish. I did this because I prefer to store my tallow in bars over mason jars. I find it difficult to scoop cold tallow out of a mason jar with a spoon, but slicing off of a cold tallow bar is easy and convenient. (I got this storage tip from Jill Winger at The Prairie Homestead, you’ll love her blog if you’ve gotten this far.)

7. Leave fat at room temperature to cool until solid. When solid, transfer to refrigerator or freezer. I cut mine into bars before refrigerating. Tallow will keep for several months in the fridge, and I’ve read accounts of tallow keeping in the freezer for years! Some people also store it at room temperature; expect it to last about a month on a cool, dark pantry shelf. I was surprised to see the end result be yellow since most commercial tallow renders white. There are a lot of variables that go into the end result color, such as the breed of cow, its diet, its age, and where the fat was on the animal. The rich golden color is an excellent indicator of the vitamin A preset in the fat. This nutrient comes from the grass that the cows ate, and would not be present in grain-fed beef.

Tallow solidifying into a beautiful golden yellow. I was surprised to see it turn yellow!

Tallow solidifying into a beautiful golden yellow. I was surprised to see it turn yellow!

8. Enjoy! Tallow is excellent for frying (McDonald’s used to use it for french fries before switching to harmful vegetable oils), sauteeing, searing meat, and for use in homemade skin-care. My cast iron skillet loves tallow; it adds a great seasoning to keep it naturally non-stick.

Toddler approved!

Toddler approved!

Bringing the Soil Back to Life with David Johnson

Johnson-Su+bioreacter+pic.jpg

The following is from the Regeneration International website.

Healthy soil is teaming with life in the form of billions of microscopic soil organisms. A teaspoon of healthy soil can contain more soil microorganisms than there are people on earth. The soil microorganisms found in healthy,  or “living soil,”  have important functions including converting nutrients for plants, building soil structure, improving how soil absorbs water, and allowing soil to draw down and sequester more carbon.

Unfortunately not all soil is alive and healthy. According to the United Nations (UN), a third of the earth’s soils are severely degraded. Soils that have been degraded by degenerative forms of agriculture may have lost the living organisms that allow soil to perform the functions necessary for the health of plants and the environment.  

Dr. David C. Johnson, molecular biologist and research scientist at the University of New Mexico, has developed a system that brings lifeless soils back to life by reintroducing beneficial microorganisms to the soil with biologically enhanced compost.

The Johnson-Su composting method creates compost teeming with microorganisms that improve soil health and plant growth and increase the soil's potential to sequester carbon. This simple composting method produces a biologically enhanced compost by creating an environment where beneficial soil microorganisms and thrive and multiply. When this biologically alive compost is applied to the soil the microorganisms inoculate the soil and work in harmony with growing plants to improve soil health and increase the amount of carbon drawn out of the atmosphere and into the soil.

Benefits of Johnson-Su Bioreactor Compost:

  • Increases soil carbon sequestration

  • Increases crop yield

  • Increases soil nutrient availability

  • Increases soil water-retention capacity

  • Produces biologically diverse compost

  • Produces nutrient–rich compost

  • Results in a low-salinity compost

  • Improves seed germination and growth rates

Benefits of Johnson-Su Bioreactor Composting System:

  • Reduces water usage up to six times

  • Reduces composting labor time by 66 percent

  • Requires no turning and little manpower

  • Is a low–tech process that can easily be replicated

  • Can be made using a diversity of compost materials

  • Produces no odors or associated insects

  • Materials generally cost less than $35 USD and can be used for up to 10 times

  • No leaching or groundwater contamination

Get the instructions here.

Is Grass-fed Beef the Most Vegan Food?

Recently a friend shared an article with us entitled “Grass-fed Beef -- the Most Vegan Item in the Supermarket” written by Andrew French and posted on medium.com. It is thoughtfully laid out, and makes a strong case that conventional row-cropping creates far more suffering than the raising and harvesting of cows for grass-finished beef.

A grain field is plowed and turned multiple times to prepare for planting, and then the crop is mechanically weeded and sprayed. Each time, small animals are disturbed, poisoned, or outright chopped up, and the larger denizens of the natural world, the foxes and deer, are pushed far away, until that field is a moonscape and a mass graveyard of animal and insect life.

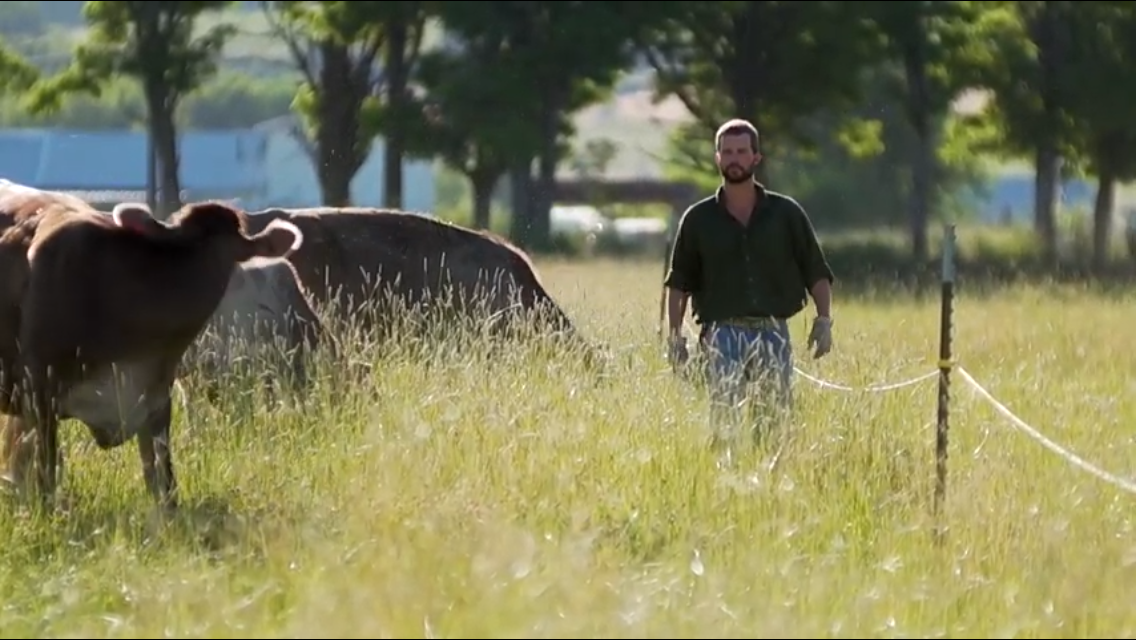
Contrast this with perennial pasture. In our pastures we grow a widely diverse mix of grasses, legumes, and herbs that provide complementing nutritional strengths for our cows, and provide cover and habitat for field mice, voles and earthworms as well as pheasants and quail, which in turn provide sustenance for hawks and owls and foxes. We also include buffer zones and transition areas along the edges of our fields that are wildlife highways.

When plants are not tilled, their root structures can grow several feet deep, sometimes up to 12 feet below the surface, helping to break up compacted soils, building healthy topsoil, and sequestering a significant amount of carbon.

We have advocated for local food for a long time, thus the author’s note about the steep demand for avocados stood out to me. According to his sources, America’s demand for avocados has driven the price out of reach for the average Mexican, where avocados are grown. Beyond that, avocado farmers in Mexico are now chopping down the pine forest habitats of the Monarch Butterfly to make room for more avocado plantations. Think about it! How many Monarch Butterflies inadvertently gave their lives for our guacamole? Nothing is without consequence.

If you have chosen a vegan diet because it feels better for your body, more power to you. We need to be sensitive to what works for each of us. However, if you have jumped on the vegan program out of concern for animals, consider this author’s perspective that vegetable and grain production takes more life than grass-finished beef.

All life is fed by consuming other life. Please appreciate, acknowledge, and respect the gift you receive in every meal. The more locally you can eat, the better you are able to do that.

Aaron

PS - Whenever people tell me “Thanks, we’re vegan,” I smile and say, “So are my cows!” :)

Ecuadorian Quinoa Casserole (from Nourishing Traditions by Sally Fallon)

A photo from the Nourishing Traditions cookbook

A photo from the Nourishing Traditions cookbook

Serves 6-8

From the Sally Fallon Cookbook, Nourishing Traditions

INGREDIENTS

  • 2 cups quinoa

  • 6 cups warm filtered water plus 2 tablespoons whey, yoghurt, kefir or buttermilk

  • 1 bunch green onions, chopped

  • 2 tablespoons extra virgin olive oil

  • 1 teaspoon annatto seeds (available in Latin American markets)

  • 4 cups beef or chicken stock 

  • 1/2 teaspoon sea salt

  • 3 cloves garlic, mashed

  • 2 medium potatoes, washed and sliced

  • 1 bunch cilantro, tied together

  • 1/2 cup piima cream or creme fraiche 

  • 5 tablespoons cream cheese

DIRECTIONS

This authentic recipe, from a chipper centenarian living in Equador, incorporates all the basic principles for easy digestion and thorough assimilation--use of rich stock made by boiling bones for a long time, presoaking of grain and the addition of cultured cream and homemade cheese, rich in fat-soluble vitamins. 

Soak quinoa in warm water mixture at least 12 hours. Rinse and drain well. Saute annatto seeds in oil for several minutes, or until oil turns yellow, and remove with a slotted spoon. Saute onions in the same oil, adding garlic at the last minute. Add quinoa and stock and bring a boil. Skim, reduce heat, cover and simmer for I hour more on very low heat. About 1/2 hour before serving, stir in the potatoes and salt. About 10 minutes before serving, add cilantro. To serve, remove cilantro and stir in cultured cream and cheese. 

NOTE FROM SALLY

Quinoa is a staple food of the Incas and the Indians in Peru, Ecuador and Bolivia. During his pioneering investigations in the 1930's, Weston Price noted that the Indians of the Andes mountains valued gruel made of quinoa for nursing mothers. Quinoa contains 16 to 20 percent protein and is high in cystine, lysine and methionine-amino acids that tend to be low in other grains. It contains iron, calcium and phosphorus, B vitamins and vitamin E,and is relatively high in fat. Like all grains, quinoa contains antin utrients and therefore requires a long soaking as part of the preparation process. SWF

Emmett Farm Memories

I asked my aunt if she would share some of her memories of moving to the Emmett farm and growing up here. We hope you enjoy these memories and photos as much as we did!


In 1934, jobs in South Gate, California were scarce. Frank Robinson was a skilled plasterer with a wife, Blanche, and two children, Frances and David, then aged 6 and 4. When they found themselves having to choose between gas for the Model T or milk for the children, they knew something had to change. A farm would mean a bit of security. At least they would eat! Frank had an acquaintance, Wes Awald, who had a dairy in Meridian, Idaho. He did Frank the favor of checking out the Larkin farm which was for sale in Emmett. It was 40 acres with a house and barn. His report was that the barn was good but the house was “not much.” Both were built with square nails. No plumbing in the house!

The decision was made. The Model T was traded for a larger Jewett for the trip. The kids’ cousin Don Malan was still in school, but old enough to drive the truck loaded with the family belongings. The trip took a week. It’s hard to imagine that trip without today’s highways, rest stops and drive through restaurants.

Blanche was beginning to have her doubts as they drove mile after mile through the desert. It was when they came to the top of Freezeout Hill and saw the beautiful valley below she began to feel confident about the move. In later years she would recall her relief, seeing “two shades of pink and white” stretching out below, in the valley that would be her home for the next 48 years.

They grew the grapes and bottled the juice themselves. Lots of the bottles were left behind as they drove. Less weight was better.

They grew the grapes and bottled the juice themselves. Lots of the bottles were left behind as they drove. Less weight was better.

TRAVELING

The trip from California to Idaho took a week, and the Robinsons had to picnic along the way. Frank fashioned a box to hold food, towels, and bottled grape juice. The photo shows one of the remaining juice bottles. The box would become a towel holder in the “wet room” of the home, a back room that Frank plumbed for a bathroom and laundry. Everything was used and reused, fixed or repurposed.

Frances with bee swarm

Frances with bee swarm

BEES

Frances was her Dad’s willing helper when the family kept bees. She turned the crank on the extractor and filled 5 pound tins so honey could be sold. The photo shows their bee keeping license issued by the Idaho Department of Agriculture. It came in the mail as a post card dated March 21, 1945 and had a 3 cent postage stamp.

IMG_20190720_144118775.jpg

A bulletin from the American Honey Institute dated May, 1945 suggested the following:

“Are you serving plenty of cottage cheese these days when meat is scarce? For dessert press cottage cheese through a sieve. Add 3 tablespoons of sour or sweet cream and 3 tablespoons of honey to each cup of cheese. Beat until fluffy. Add 1/8 teaspoon of salt. Note: This is also delicious when served as a topping on gingerbread, fruit gelatin, or cherry tarts.”

American Honey Institute Bulletin

American Honey Institute Bulletin

BALING HAY

During WWII farm laborers were hard to come by. To manage hay season, a loan from Blanche’s brother Will allowed them to purchase a Case wire baler. It took all four family members to complete the job. Frances drove the tractor; Blanche fed the wires into the slots of the wood block, wearing leather gloves; David tied the wires as the 100 pound bales worked their way to the end of the process; and Frank had the dusty job of placing the wooden block that marked the end of one bale and the start of a new one. It was the first baler of its kind in the Valley.

DAIRY COWS

Soon after arriving in Emmett, Frank arranged to pasture dairy cows in exchange for the milk, probably around 8 cows. Frances was the tail holder while her Dad sat on a T stool to milk. After some time, Frank fashioned tail holders from rubber hose and heavy wire. Milk went into 10 gallon cans to be cooled in the irrigation ditch until they were picked up. As time went on, they purchased a separator and sold cream to the creamery.